
Indulge in the Warm Embrace of Apple Crisp
As the leaves turn golden and the air fills with the scent of cinnamon, there’s no better way to celebrate the arrival of fall than with a warm, homemade Apple Crisp. This delightful dessert combines tender, sweet apples with a crunchy oat topping, creating a perfect harmony of textures and flavors. Picture a cozy evening with loved ones, where the aroma of baked apples wafts through the air, inviting everyone to gather around the table. Whether it’s a holiday feast, a cozy family dinner, or a simple weeknight treat, this Apple Crisp is sure to become a cherished favorite in your kitchen.
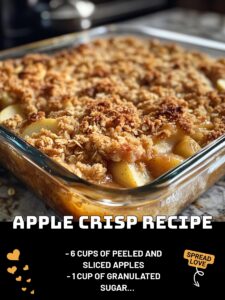
Ingredients Overview
- 6 cups of peeled and sliced apples
Select a mix of tart and sweet apples like Granny Smith, Honeycrisp, or Fuji for a balanced flavor. Ensure they are firm and juicy for the best texture. - 1 cup of granulated sugar
This will sweeten the apples, enhancing their natural sweetness while allowing them to release their juices during baking. - 1 tablespoon of all-purpose flour
This helps thicken the apple mixture, preventing it from becoming too runny. - 1 teaspoon of ground cinnamon
The warm, comforting spice that brings out the best in your apples, adding a hint of nostalgia. - 1/2 cup of water
To create a lovely syrup that bathes the apples, making them tender and juicy. - 1 cup of old-fashioned oats
For that delightful crunch! Old-fashioned oats provide the perfect texture, while also soaking up some of the apple juices. - 1/2 cup of packed brown sugar
This adds a deeper, caramel-like flavor, complementing the apples beautifully. - 1/4 cup of all-purpose flour
This flour helps bind the oat topping, giving it a lovely texture. - 1/4 cup of unsalted butter, melted
The richness of butter not only adds flavor but also helps achieve that golden-brown, crispy topping.
Step-by-Step Cooking Instructions
1. Preheat Your Oven
Preheat your oven to 350°F (175°C). This ensures the Apple Crisp will bake evenly, resulting in perfectly tender apples and a beautifully crisp topping.
2. Prepare the Apple Mixture
In a large mixing bowl, combine the peeled and sliced apples, granulated sugar, 1 tablespoon of flour, ground cinnamon, and water. Mix gently until the apples are well coated. Pour this luscious mixture into a greased 9×13 inch baking dish, spreading it evenly.
3. Create the Oat Topping
In a separate bowl, combine the old-fashioned oats, brown sugar, 1/4 cup of flour, and melted butter. Stir until the mixture becomes crumbly and resembles coarse sand. This crumbly topping is what makes the crisp so delightful!
4. Assemble the Crisp
Sprinkle the oat mixture evenly over the apple mixture in the baking dish. Make sure to cover the apples well for a balanced bite of fruit and crunch.
5. Bake to Perfection
Place the baking dish in the preheated oven and bake for 40-45 minutes, or until the topping is golden brown and the apples are tender. The bubbling juices and inviting aroma will fill your kitchen!
6. Serve and Enjoy
Allow the Apple Crisp to cool slightly before serving. For the ultimate indulgence, serve warm with a generous scoop of vanilla ice cream or a dollop of whipped cream.
Frequently Asked Questions
1. Can I use different types of apples?
Absolutely! A mix of tart and sweet apples will create the best flavor profile.
2. Can I make this recipe gluten-free?
Yes, substitute regular flour with gluten-free flour and ensure your oats are certified gluten-free.
3. Can I prepare this in advance?
You can prepare the apple filling a day ahead. Just assemble the crisp before baking.
4. How do I store leftovers?
Store in an airtight container in the refrigerator for up to 3 days.
5. Can I freeze Apple Crisp?
Yes, cover it tightly and freeze for up to 3 months. Thaw before reheating.
6. What’s the best way to reheat Apple Crisp?
Reheat in the oven at 350°F for about 10-15 minutes until warmed through.
7. Can I add nuts to the topping?
Certainly! Chopped pecans or walnuts would add a delightful crunch and flavor.
8. How can I make it less sweet?
Reduce the sugar in the apple mixture or use tart apples.
9. Is it okay to use frozen apples?
Yes, just make sure to thaw and drain excess moisture before baking.
10. Can I make it vegan?
Yes, substitute the butter with coconut oil or vegan butter and use maple syrup instead of sugar.
11. How do I know when it’s done?
The topping should be golden brown, and the apples should be bubbly and tender.
12. Can I use instant oats?
While you can, instant oats may not provide the same crunchy texture as old-fashioned oats.
13. What’s the serving size?
Typically, a serving is about 1 cup, but feel free to indulge!
14. How can I enhance the flavor?
Adding a splash of vanilla extract or a squeeze of lemon juice can elevate the flavors beautifully.
15. Can I use other fruits?
Yes, consider adding berries or peaches for a fruity twist!
16. How long does it take to prepare?
Preparation should take about 15 minutes, with a baking time of 40-45 minutes.
17. What if I don’t have brown sugar?
You can substitute with white sugar, but the flavor will be slightly different.
18. Is it better to serve warm or cold?
Warm is ideal, especially with ice cream!
19. Can I make individual servings?
Yes, use ramekins for single servings; adjust baking time as needed.
20. What’s the nutritional information?
One serving contains about 260 calories, with 7g of fat, 4g of saturated fat, and 33g of sugar.
Helpful Tips
1. Choose the right apples
A mix of sweet and tart apples will enhance the flavor.
2. Don’t skimp on the cinnamon
It adds warmth and depth to the dish.
3. Let the mixture rest
Allowing the apple mixture to sit for a few minutes helps enhance the flavors.
4. Use cold butter
For a crisper topping, use cold melted butter.
5. Mix the topping by hand
This allows for better control of the texture; it should be crumbly, not paste-like.
6. Experiment with spices
Add nutmeg or ginger for a unique twist.
7. Serve with a side of yogurt
Greek yogurt is a great healthy alternative to ice cream.
8. Use a glass baking dish
This allows you to see the bubbling apples through the sides.
9. Avoid overmixing the topping
You want it to remain crumbly, not doughy.
10. Taste your apples first
Adjust sugar based on the sweetness of your apples.
11. Add a splash of lemon juice
It brightens the flavors and balances the sweetness.
12. Pair with a hot beverage
Apple Crisp is even better with a warm cup of chai or cider!
13. Keep an eye on the bake time
Ovens can vary, so check for doneness a few minutes early.
14. Layer it up
For a unique presentation, layer the apples and topping in a trifle dish.
15. Drizzle caramel sauce
For an extra indulgent treat, drizzle caramel over the top.
16. Try it with different grains
Mix in some crushed nuts or coconut for added texture.
17. Make it a breakfast treat
Serve with yogurt and fresh fruit for a delicious breakfast.
18. Clean your apples properly
Wash them well to remove any wax or residues.
19. Try an oat-free version
Use a nut topping instead if you prefer.
20. Don’t forget to share!
Apple Crisp is best enjoyed with friends and family.
Storage and Reheating Tips
1. Refrigerate leftovers
Store in an airtight container in the refrigerator for up to 3 days.
2. Reheat in the oven
For the best texture, reheat at 350°F for about 10-15 minutes.
3. Freeze for later
Wrap tightly in foil or plastic wrap and freeze for up to 3 months.
4. Thaw before baking
If frozen, thaw overnight in the refrigerator before reheating.
5. Portion it out
Consider freezing in single servings for quick desserts later.
6. Avoid microwaving
Microwaving can make the topping soggy; stick to the oven for reheating.
7. Store toppings separately
If you make the topping ahead, store it separately to maintain its crispness.
8. Use glass containers
They are easier to clean and help maintain the dessert’s flavor.
9. Label and date your storage
Always label with the date to keep track of freshness.
10. Enjoy within a week
For the best taste, enjoy within a week of preparation.
Secrets for Culinary Perfection
- Taste as you go: Adjust sweetness according to your preference by tasting the apple mixture.
- Balance flavors: Use a mix of spices to complement the apples and add complexity.
- Experiment with textures: Mix in nuts or seeds to add crunch to your topping.
- Don’t rush: Allow the apple mixture to sit and soak in the sugar for at least 15 minutes.
- Even slices: Slice your apples uniformly to ensure even cooking.
- Perfect crust: If you prefer a thicker topping, increase the oats to 1.5 cups.
- Brown sugar substitution: If you’re out of brown sugar, mix white sugar with a bit of molasses for a quick substitute.
- Baking dish matters: Use a glass dish for even baking; avoid metal for best results.
- Watch the bake time: Begin checking for doneness after 35 minutes, as ovens can vary.
- Cool before serving: Allow to cool slightly for the best serving consistency.
This Apple Crisp recipe is not just a dessert; it’s a warm hug in a bowl. It brings friends and family together, celebrating the cozy moments of fall with every delicious bite. So, gather your loved ones, don your apron, and let the comforting scents of baked apples and cinnamon fill your home. Happy baking! 🍏✨


