Homemade Chicken Taquitos: A Flavorful Fiesta for Your Taste Buds!
Elevate your snack game with our Homemade Chicken Taquitos, a culinary masterpiece that brings together the savory goodness of shredded rotisserie chicken, creamy cream cheese, tangy sour cream, zesty salsa, and a blanket of your favorite shredded cheese—all encased in a golden, crispy tortilla shell. This delightful recipe promises to be the star of your appetizer spread or a satisfying snack for any occasion.
Cooking time :
The cooking time for Homemade Chicken Taquitos can vary based on the method you choose. Here’s a breakdown:
- Frying Time:
- When frying the taquitos in a skillet, each side typically takes about 2-3 minutes or until they turn golden brown and crispy. Frying time may vary depending on the size of the taquitos and the temperature of the oil.
- Microwaving Tortillas:
- Warming the tortillas in the microwave for 20-30 seconds is a quick step to make them more pliable for rolling.
- Preparation Time:
- The overall preparation time, including shredding the chicken, mixing the filling, rolling the taquitos, and securing them with toothpicks, might take approximately 20-30 minutes.
- Optional Baking Method:
- If you prefer a baked version, you can preheat your oven to 400°F (200°C) and bake the taquitos for about 15-20 minutes or until they are golden and crispy.
Ingredients:
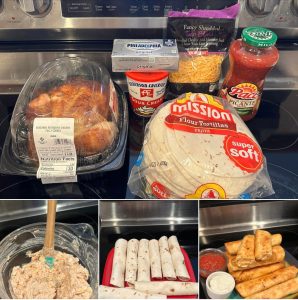
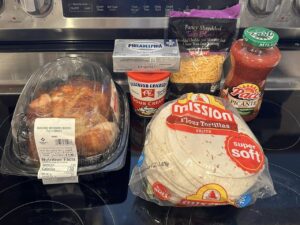
- 1 rotisserie chicken, shredded (approx. 4 cups): Use a store-bought rotisserie chicken or roast one at home. Shred the chicken, discarding the skin and bones.
- 1 block cream cheese: Ensure the cream cheese is softened to make it easier to mix with other ingredients.
- 1/3 cup sour cream: Adds creaminess and a tangy flavor to the filling.
- 1/2 cup salsa: Use your favorite salsa for added flavor. Adjust the quantity based on your taste preferences.
- 1 1/2 cups shredded cheese (your choice): Choose a cheese variety you enjoy, such as cheddar, Monterey Jack, or a Mexican blend.
- 10-12 small flour tortillas: Use small-sized tortillas for bite-sized taquitos.
- Cooking oil for frying: Use a neutral oil with a high smoke point, like vegetable or canola oil.
- Toothpicks: Used to secure the taquitos while frying.
Instructions:
1. Shred Rotisserie Chicken:
- Remove the meat from the rotisserie chicken, shred it using two forks, and discard the skin and bones. Measure out approximately 4 cups of shredded chicken.
2. Prepare Filling:
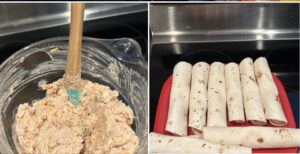
- In a large mixing bowl, combine the shredded chicken, softened cream cheese, sour cream, salsa, and shredded cheese. Mix thoroughly until all ingredients are well combined. Adjust the seasoning if needed.
3. Warm Tortillas:
- Heat the tortillas in the microwave for 20-30 seconds to make them pliable. This makes rolling the taquitos easier.
4. Assemble Taquitos:
- Spoon 2-3 tablespoons of the chicken mixture onto the center of each tortilla. Roll up the tortilla tightly around the filling.
5. Secure with Toothpick:
- Insert a toothpick through the seam of each rolled taquito to keep it secure during frying.
6. Heat Cooking Oil:
- In a skillet, heat enough cooking oil over medium-high heat. The oil should be hot enough to fry the taquitos to a golden brown.
7. Fry Taquitos:
- Carefully place the taquitos, seam side down, into the hot oil. Fry each side for 2-3 minutes or until they turn golden brown and crispy.
8. Drain and Serve:
- Remove the taquitos from the oil and place them on a paper towel-lined plate to drain any excess oil.
9. Remove Toothpicks:
- Before serving, remember to remove the toothpicks from the taquitos to avoid any accidents.
10. Serve Warm:
- Serve the Homemade Chicken Taquitos warm with your favorite dipping sauces, such as sour cream or additional salsa.
Here are some tips to ensure success when making Homemade Chicken Taquitos:
- Use Rotisserie Chicken: Utilizing a store-bought rotisserie chicken adds convenience and rich flavor to your taquitos. Shred the chicken finely for a more even distribution in the filling.
- Soften Cream Cheese: Ensure the cream cheese is softened at room temperature before mixing. This ensures a smoother and more easily blended filling.
- Choose Your Cheese: Select a cheese variety you love, whether it’s cheddar, Monterey Jack, or a Mexican blend. The cheese adds richness to the filling.
- Warm Tortillas Properly: Microwaving the tortillas for a short time makes them more pliable and prevents them from cracking when rolled.
- Secure with Toothpicks: Insert toothpicks through the seam of each rolled taquito before frying to prevent them from unraveling. Remember to remove them before serving.
- Monitor Oil Temperature: If frying, maintain a consistent oil temperature for even cooking. Test the oil’s readiness by adding a small piece of tortilla – it should sizzle and turn golden.
- Prevent Overcrowding: Fry taquitos in batches to prevent overcrowding in the skillet, ensuring they cook evenly.
- Baking Option: If you prefer a healthier alternative, consider baking the taquitos. Preheat the oven and bake until they are golden brown and crispy.
- Dipping Sauces: Serve with your favorite dipping sauces such as sour cream, guacamole, or additional salsa to enhance the overall flavor.
- Presentation: Present the taquitos on a vibrant platter with garnishes like fresh cilantro, lime wedges, or additional shredded cheese for an appealing presentation.
- Make-Ahead: Prepare the filling in advance and store it in the refrigerator. When ready to serve, assemble and cook the taquitos for a quick and fresh appetizer.
- Variations: Feel free to experiment with the filling by adding ingredients like diced green chilies, black beans, or corn to customize the flavor to your liking.
By following these tips, you’ll be on your way to creating delicious and perfectly crispy Homemade Chicken Taquitos. Enjoy the delightful blend of flavors and textures in each bite!
How to store Homemade Chicken Taquitos:
Storing Homemade Chicken Taquitos properly helps maintain their freshness and texture. Here’s how you can store them:
Short-Term Storage (Up to 2-3 Days):
- Refrigeration:
- Place any leftover taquitos in an airtight container and store them in the refrigerator. This helps to keep them fresh for a few days.
- Avoid Moisture:
- Ensure that the container is moisture-free to prevent the taquitos from becoming soggy.
- Reheating:
- When ready to enjoy, reheat the taquitos in the oven at 350°F (175°C) for about 10-15 minutes or until heated through. This helps maintain their crispiness.
Longer-Term Storage (Freezing):
- Flash Freeze:
- If you want to store taquitos for an extended period, flash freeze them individually on a baking sheet before transferring to a freezer bag. This prevents them from sticking together.
- Label and Date:
- Label the freezer bag with the date of preparation to track freshness. Taquitos can be stored in the freezer for up to 2-3 months.
- Reheating from Frozen:
- When ready to eat, reheat frozen taquitos in the oven at 350°F (175°C) for 15-20 minutes or until they are heated through and crispy.
General Tips:
- Separate Layers: If stacking taquitos for storage, place a sheet of parchment paper or wax paper between layers to prevent sticking.
- Avoid Microwaving for Reheating: While the microwave is convenient, it may result in softened taquitos. Reheating in the oven or toaster oven helps maintain their crispy texture.
- Check for Freshness: Before serving reheated taquitos, check for freshness and crispiness. If needed, place them back in the oven for a few additional minutes.
- Individual Portions: Consider freezing taquitos in individual portions for easy reheating and serving.
By following these storage tips, you can enjoy Homemade Chicken Taquitos at their best, whether you’re reheating leftovers or planning for future meals.
Popular Questions and Answers:
Here are some popular questions and answers related to Homemade Chicken Taquitos:
- Q1: Can I use corn tortillas instead of flour tortillas? A1: Yes, you can use corn tortillas if you prefer or have dietary restrictions. Keep in mind that corn tortillas may require a different warming technique, such as briefly heating them on a hot griddle.
- Q2: Can I make these taquitos ahead of time for a party? A2: Absolutely! You can prepare the filling in advance, assemble the taquitos, and store them in the refrigerator until you’re ready to fry or bake. This makes them a convenient and crowd-pleasing party snack.
- Q3: Can I bake these taquitos instead of frying them? A3: Yes, baking is a healthier alternative. Preheat your oven to 400°F (200°C) and bake the taquitos for about 15-20 minutes or until they are golden and crispy.
- Q4: Can I freeze the taquitos before frying or baking them? A4: Yes, you can freeze the assembled taquitos before frying or baking. Flash freeze them individually on a baking sheet before transferring to a freezer bag. Label and date the bag for future use.
- Q5: What dipping sauces pair well with these taquitos? A5: Taquitos pair well with various dipping sauces, such as sour cream, guacamole, salsa, or a cilantro-lime crema. Feel free to offer an assortment for guests to choose from.
- Q6: Can I make these taquitos with a different type of meat? A6: Certainly! You can customize the filling with different types of meat, such as shredded beef, pork, or even a meatless option with beans and vegetables.
- Q7: How do I prevent the taquitos from getting soggy when reheating? A7: Reheat taquitos in the oven instead of the microwave to maintain their crispiness. This ensures that the tortillas stay crunchy, providing a more enjoyable eating experience.
- Q8: What’s the best way to store leftover taquitos? A8: Store leftover taquitos in an airtight container in the refrigerator for short-term storage. For longer storage, freeze them individually and then transfer to a freezer bag.


