
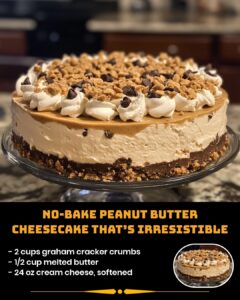
No-Bake Peanut Butter Cheesecake That’s Irresistible
Are you dreaming of a decadent dessert without the hassle of baking? This No-Bake Peanut Butter Cheesecake is your perfect solution. Creamy, rich, and effortlessly indulgent, it’s a treat that resonates with comfort and satisfaction. This recipe brings together the classic flavors of peanut butter and cheesecake, all wrapped up in an easy-to-make dessert that’s as enjoyable to prepare as it is to eat.
Introduction: A Tale of Comfort and Indulgence
Imagine a dessert that combines the velvety richness of cheesecake with the comforting nuttiness of peanut butter — all without turning on your oven. This recipe is perfect for busy days, lazy afternoons, or when the summer heat makes baking unbearable. Its simplicity doesn’t compromise on flavor, making it a go-to dessert for celebrations, casual gatherings, or a quiet moment of indulgence. This cheesecake is a love letter to peanut butter fans and a no-fuss masterpiece for dessert enthusiasts.
Ingredients Overview
For the Crust:
- 2 cups graham cracker crumbs: Provides a crunchy base with a hint of sweetness.
- 1/2 cup melted butter: Helps bind the crumbs together for a firm crust.
For the Filling:
- 24 oz cream cheese (softened): The creamy foundation of the cheesecake.
- 1 cup creamy peanut butter: Adds a rich, nutty flavor.
- 1 cup powdered sugar: Balances the tanginess of cream cheese and enhances sweetness.
- 1 tsp vanilla extract: Introduces a subtle depth of flavor.
- 1 cup heavy cream: Whipped to add lightness and structure.
For the Topping:
- 1/2 cup chocolate chips (melted): A luscious drizzle for a visually appealing and delicious finish.
Step-by-Step Cooking Instructions
Step 1: Prepare the Crust
- Combine the crumbs and butter: In a medium bowl, mix graham cracker crumbs and melted butter until fully combined.
- Press into the pan: Firmly press the mixture into the bottom of a 9-inch springform pan to form an even crust. Chill while preparing the filling.
Step 2: Make the Filling
- Beat the main ingredients: In a large bowl, use an electric mixer to beat the cream cheese, peanut butter, powdered sugar, and vanilla extract until smooth and fluffy.
- Whip the cream: In a separate bowl, whip the heavy cream until stiff peaks form.
- Fold together: Gently fold the whipped cream into the peanut butter mixture to maintain the airy texture.
Step 3: Assemble the Cheesecake
- Spread the filling: Pour the filling over the chilled crust, spreading it evenly with a spatula.
- Drizzle chocolate: Melt the chocolate chips and drizzle over the top for a decorative finish.
Step 4: Chill and Serve
- Refrigerate: Chill the cheesecake in the refrigerator for at least 4 hours or overnight until set.
- Serve: Slice and enjoy this creamy, no-bake delight!
Frequently Asked Questions
1. Can I use natural peanut butter?
Yes, but ensure it’s well-stirred to avoid a grainy texture in your cheesecake.
2. Can I substitute the graham crackers?
Absolutely! Try crushed cookies like Oreos or digestive biscuits for a fun twist.
3. How long does it take to set?
It needs at least 4 hours in the refrigerator, but overnight is best for optimal firmness.
4. Can I make it ahead?
Yes, this cheesecake can be made up to 2 days in advance.
5. Can I freeze this cheesecake?
Yes, wrap it tightly and freeze for up to 2 months. Thaw in the refrigerator before serving.
6. Can I use crunchy peanut butter?
Certainly! Crunchy peanut butter adds a delightful texture to the filling.
7. What’s the best way to melt chocolate?
Use a microwave in 30-second intervals, stirring in between, or use a double boiler for gentle heating.
8. Can I make mini cheesecakes instead?
Yes, use cupcake liners in a muffin tin for individual servings. Adjust chilling time accordingly.
9. Can I add a layer of jelly?
Yes! A thin layer of your favorite jelly or jam can complement the peanut butter flavor beautifully.
10. What can I use if I don’t have a springform pan?
A regular pie dish works too, but slicing might be trickier.
11. How can I make the crust gluten-free?
Use gluten-free graham crackers or cookies for the crust.
12. Can I add whipped cream on top?
Yes, a dollop of whipped cream makes an excellent garnish.
13. How do I prevent the cheesecake from sticking to the pan?
Line the bottom of the pan with parchment paper for easy removal.
14. Can I use a sugar substitute?
Yes, powdered sugar substitutes like stevia or monk fruit work well.
15. Can I add nuts to the topping?
Crushed peanuts or pecans can add a lovely crunch on top.
16. Is it okay to use pre-whipped cream?
While possible, fresh heavy cream whipped to stiff peaks offers better texture and flavor.
17. Can I use dark chocolate instead of milk chocolate for the drizzle?
Absolutely! Dark chocolate provides a richer, less sweet contrast.
18. How should I transport this cheesecake?
Keep it chilled and transport in a cooler or insulated bag.
19. Can I add cocoa powder to the filling?
Yes, a tablespoon or two of cocoa powder can create a chocolate-peanut butter variation.
20. What can I do if the crust crumbles?
Press it down more firmly and ensure the butter-to-crumb ratio is correct.
20 Helpful Tips
Tip 1: Always use softened cream cheese
This ensures a smooth, lump-free filling.
Tip 2: Chill the crust before adding the filling
This helps the crust firm up and hold together.
Tip 3: Use a hot knife for slicing
Dip a knife in hot water, wipe it dry, and slice for clean cuts.
Tip 4: Experiment with toppings
Crushed peanuts, caramel drizzle, or whipped cream can elevate the presentation.
Tip 5: Use high-quality peanut butter
The flavor of the cheesecake depends heavily on the quality of peanut butter.
Tip 6: Don’t overwhip the cream
Overwhipped cream can become grainy and affect the texture of the filling.
Tip 7: Add a pinch of salt
A tiny pinch of salt can enhance the sweetness and balance flavors.
Tip 8: Use full-fat cream cheese
For the creamiest texture, avoid low-fat or whipped versions.
Tip 9: Let the cheesecake rest at room temperature before serving
This ensures a softer, creamier texture.
Tip 10: Freeze for easier slicing
Pop the cheesecake in the freezer for 20 minutes before slicing.
Tip 11: Avoid overfilling the pan
Leave a little space at the top to prevent overflow.
Tip 12: Use a silicone spatula
This makes it easier to spread the filling evenly.
Tip 13: Refrigerate the melted chocolate before drizzling
Slightly cooling it prevents it from sinking into the filling.
Tip 14: Add a teaspoon of espresso powder
Espresso powder enhances the chocolate flavor in the drizzle.
Tip 15: Use a food processor for the crust
This ensures evenly crushed crumbs for a uniform base.
Tip 16: Let whipped cream chill before folding
Cold whipped cream holds its shape better when mixed.
Tip 17: Serve with fresh fruit
Slices of banana or strawberries complement the peanut butter flavor.
Tip 18: Clean the springform pan before unmolding
Wipe the sides of the pan with a damp cloth to ensure smooth edges.
Tip 19: Add a hint of cinnamon to the crust
A pinch of cinnamon can add warmth and complexity to the crust.
Tip 20: Use a cake stand for presentation
A cake stand elevates the cheesecake’s visual appeal during serving.
10 Storage and Reheating Tips
1. Store in the refrigerator
Cover with plastic wrap or aluminum foil to keep it fresh.
2. Keep it airtight
Use an airtight container to prevent absorbing other odors from the fridge.
3. Label your storage container
Write the date on the container to track freshness.
4. Freeze individual slices
Wrap each slice in plastic wrap and store in a freezer-safe bag.
5. Thaw in the refrigerator
Move frozen slices to the fridge a few hours before serving.
6. Avoid leaving it out for too long
Keep the cheesecake refrigerated to maintain its texture.
7. Use parchment paper between slices
This prevents slices from sticking together during storage.
8. Don’t refreeze thawed cheesecake
Refreezing can alter the texture and flavor.
9. Serve chilled
Cold cheesecake tastes better and holds its shape.
10. Use a cake dome for short-term storage
A cake dome works well if you plan to finish it within a day or two.
Secrets to the Perfect No-Bake Peanut Butter Cheesecake
1. Choose the Right Peanut Butter
Opt for creamy peanut butter without added sugar or oils for the best texture and flavor. Natural peanut butter works well, but ensure it’s well-stirred.
2. Use Room Temperature Ingredients
Allow your cream cheese to come to room temperature before mixing to avoid lumps in the filling.
3. Master the Crust
Press the graham cracker crust firmly into the pan using the back of a spoon or a flat-bottomed glass. This creates a solid base for the cheesecake.
4. Don’t Overmix the Whipped Cream
Fold the whipped cream gently into the cream cheese mixture to keep the filling light and fluffy.
5. Chill for Optimal Results
Refrigerate the cheesecake for at least 6 hours (or overnight if possible) to allow it to set properly.
6. Layer It Up
For added visual appeal, layer some crushed graham crackers or chocolate chips between the filling layers.
7. Drizzle with Flair
Instead of drizzling melted chocolate, try swirling it into the top layer with a toothpick for a marbled effect.
8. Add a Crunchy Topping
Chopped peanuts or peanut butter cups make a delightful crunchy garnish.
9. Experiment with Flavors
Mix in a tablespoon of espresso powder or cocoa powder for a mocha twist.
10. Use Quality Chocolate
For the melted chocolate topping, high-quality chocolate chips or a bar will elevate the taste.
11. Freeze for Longer Shelf Life
This cheesecake freezes beautifully. Wrap individual slices in plastic wrap and store them in an airtight container.
12. Make It Mini
Create individual cheesecakes using a muffin tin lined with cupcake wrappers for easy portioning.
13. Check Pan Size
Ensure your springform pan is leakproof. If not, line it with parchment paper for added security.
14. Avoid Condensation
When refrigerating, cover the pan with plastic wrap but ensure it doesn’t touch the surface of the cheesecake to prevent condensation.
15. Serve at the Right Temperature
For the best flavor, let the cheesecake sit at room temperature for 10-15 minutes before serving.
16. Use a Hot Knife for Slicing
Dip your knife in hot water and wipe it clean between cuts for neat, professional-looking slices.
17. Infuse with Vanilla Bean
Scrape a vanilla bean into the filling for a luxurious flavor boost.
18. Play with Nut Butters
Swap peanut butter with almond or cashew butter for a different twist.
19. Add a Hint of Salt
A sprinkle of flaky sea salt on top enhances the sweetness and balances the flavors.
20. Presentation Matters
Serve with a drizzle of caramel or a dollop of whipped cream for an elegant touch.
Conclusion
This No-Bake Peanut Butter Cheesecake is more than just a dessert; it’s an indulgent experience. Its creamy texture, balanced sweetness, and rich peanut butter flavor make it a show-stopper for any occasion. Whether you’re celebrating a special moment or simply treating yourself, this recipe promises to deliver smiles and satisfaction.
With these tips, secrets, and storage ideas, you’re equipped to make the perfect cheesecake every time. Remember, cooking is as much about creativity and joy as it is about following instructions. Have fun in the kitchen, and let this cheesecake bring a little extra sweetness to your day. Bon appétit!