
Creamy Peanut Butter Fudge: A Sweet Slice of Nostalgia
Who doesn’t love the creamy, melt-in-your-mouth goodness of homemade peanut butter fudge? Whether you’re sharing it with friends at a gathering or indulging in a sweet moment by yourself, this classic treat brings a comforting sense of nostalgia. Perfectly balancing sweetness and rich peanut butter flavor, this fudge recipe is quick, simple, and utterly satisfying. Let’s take a trip down memory lane and recreate this beloved dessert with a few thoughtful touches and expert tips to ensure your fudge is perfection every time.
Ingredients Overview
- 2 cups of sugar: The cornerstone of any good fudge, sugar gives this treat its characteristic sweetness and smooth texture.
- 1/2 cup milk: Milk adds creaminess, helping to dissolve the sugar and bring a rich, velvety texture to the fudge.
- 1 cup peanut butter: The star of the show, peanut butter gives this fudge its distinctive nutty flavor and creamy consistency.
- Splash of vanilla: Just a hint of vanilla rounds out the flavors, adding warmth and depth to the fudge.
Step-by-Step Cooking Instructions
Step 1: Prep Your Pan
Before you start cooking, prepare your pan. For this recipe, an 8×8-inch glass or metal pan works perfectly. Line the pan with parchment paper, leaving some overhang on the sides to make it easier to lift the fudge out later.
Step 2: Mix Sugar and Milk
In a medium saucepan, combine 2 cups of sugar and 1/2 cup of milk. Stir the mixture over medium heat until the sugar dissolves completely.
Step 3: Bring to a Boil
Increase the heat slightly and bring the mixture to a rolling boil. Boil for exactly 2 1/2 minutes without stirring. This boiling time is crucial for achieving the right consistency, so set a timer!
Step 4: Add Peanut Butter and Vanilla
Once the boiling time is up, remove the saucepan from the heat. Immediately stir in 1 cup of peanut butter and a splash of vanilla extract. Continue stirring until the mixture is smooth and creamy.
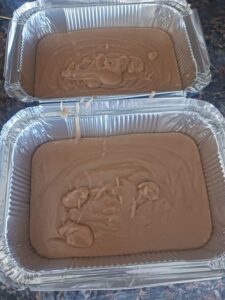
Step 5: Pour and Set
Pour the fudge mixture into your prepared pan, spreading it evenly with a spatula. Let the fudge cool at room temperature until it’s set. If you’re in a hurry, you can place it in the fridge for faster setting.
Step 6: Slice and Serve
Once the fudge is fully set, lift it out of the pan using the parchment paper overhang. Cut the fudge into squares and enjoy!
Frequently Asked Questions
How do I know if I’ve boiled the sugar mixture long enough?
- The boiling time is essential. Boil for exactly 2 1/2 minutes. The mixture should reach the soft-ball stage, which is about 235°F (113°C).
Can I use crunchy peanut butter instead of creamy?
- Yes! Crunchy peanut butter adds a delightful texture to the fudge, giving you little bits of peanuts in every bite.
What if my fudge doesn’t set properly?
- If your fudge is too soft, it may be undercooked. Be sure to boil the sugar mixture for the full 2 1/2 minutes.
Can I double the recipe?
- Absolutely! Just double all the ingredients and use a larger pan to accommodate the increased quantity.
How can I make my fudge creamier?
- For an extra creamy texture, consider adding a tablespoon of butter to the sugar and milk mixture before boiling.
Can I add chocolate to this fudge?
- Yes, swirl in some melted chocolate after mixing in the peanut butter for a chocolate-peanut butter twist.
Is there a substitute for vanilla extract?
- You can use almond extract or maple extract for a different flavor profile.
Can I use a different type of sugar?
- Granulated white sugar is recommended, but you could experiment with brown sugar for a slightly different flavor.
What’s the best way to store the fudge?
- Store the fudge in an airtight container at room temperature for up to a week or in the fridge for longer freshness.
Can I freeze the fudge?
- Yes, fudge freezes well. Wrap it tightly in plastic wrap and store it in a freezer-safe container for up to 3 months.
Helpful Tips
**1. Choose Quality Ingredients: The better the peanut butter and vanilla, the richer your fudge will taste.
**2. Don’t Skip the Parchment: Lining your pan makes removing the fudge so much easier.
**3. Measure Precisely: Accurate measurements ensure the fudge sets properly.
**4. Keep an Eye on the Boil: Boil for exactly 2 1/2 minutes – no more, no less.
**5. Use a Heavy-Bottomed Pan: This helps distribute heat evenly and prevents the sugar from burning.
**6. Stir Vigorously: Once you add the peanut butter, stir until it’s completely smooth.
**7. Cool Completely: Let the fudge cool at room temperature for the best texture.
**8. Experiment with Flavors: Add a pinch of sea salt or a sprinkle of cinnamon for a unique twist.
**9. Cut with a Sharp Knife: Use a sharp, clean knife to cut the fudge into squares.
**10. Serve at Room Temperature: For the best texture, let the fudge come to room temperature before serving.
Storage Tips
**1. Store in an Airtight Container: Keeps the fudge fresh and prevents it from drying out.
**2. Layer with Parchment Paper: If stacking pieces, use parchment paper to prevent sticking.
**3. Keep Away from Heat: Store the fudge in a cool, dry place to avoid melting.
**4. Fridge Storage: Fudge can be refrigerated, but let it come to room temperature before serving.
**5. Freeze for Long-Term Storage: Wrap tightly in plastic and freeze for up to 3 months.
**6. Use a Moisture Absorber: Consider placing a food-safe moisture absorber in the container to keep fudge dry.
**7. Seal with Plastic Wrap: Wrapping each piece individually can prevent drying.
**8. Avoid Odor Absorption: Store fudge away from strong-smelling foods to prevent it from absorbing odors.
**9. Check for Freshness: Even with proper storage, fudge is best enjoyed within a week.
**10. Label and Date: If freezing, label and date the container so you know when it was made.
Recipe Secrets
**1. Soft-Ball Stage: Understanding the soft-ball stage of candy making can make or break your fudge. This is when the sugar mixture, dropped into cold water, forms a soft ball that flattens when removed.
**2. Butter Addition: Adding a tablespoon of butter to the boiling mixture can enhance creaminess.
**3. Flavor Enhancements: A tiny pinch of salt can elevate the sweetness and flavor of your fudge.
**4. Temperature Control: Cooking fudge on a medium-low heat allows for more control and reduces the risk of burning.
**5. Mix-in Options: Chopped nuts, chocolate chips, or dried fruit can be mixed in with the peanut butter for added texture and flavor.
**6. Don’t Over-Stir: Once the fudge is smooth, avoid over-stirring as it can cause the fudge to seize.
**7. Texture Control: For a firmer fudge, cook the sugar mixture a bit longer, for softer fudge, a shorter time.
**8. Parchment Paper Tip: Lightly grease the parchment paper before pouring the fudge for an even easier release.
**9. Pan Choice: Metal pans cool faster and set fudge quicker, while glass pans may require a bit more cooling time.
**10. Room Temperature Ingredients: Using room temperature peanut butter ensures it mixes smoothly into the fudge.
Conclusion
Making fudge is a delightful process that brings joy with every creamy, sweet bite. With these expert tips and a dash of patience, you’ll be able to create the perfect peanut butter fudge every time. Remember, the key is in the details – from the perfect boil time to the right mix-ins – and with a bit of practice, you’ll have a timeless treat that will impress at any gathering.
Feel free to share your own fudge-making tips or variations in the comments below! Happy cooking!