
Pecan Caramel Turtle Bars: A Sweet Symphony of Flavors
Indulge in the perfect combination of sweet, crunchy, and gooey with these Pecan Caramel Turtle Bars! The delightful contrast of chewy caramel, crunchy pecans, and a buttery shortbread crust will have your taste buds singing with joy. These bars are not just a dessert; they’re a celebration of flavors that can turn any gathering into a special occasion. Whether you’re hosting a cozy get-together or simply craving a sweet treat at home, these bars are sure to impress.
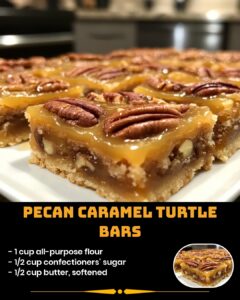
Ingredient Overview
Before we dive into the delightful process of making these bars, let’s take a moment to appreciate each ingredient that brings this recipe to life:
- All-Purpose Flour (1 cup): The foundation of our buttery shortbread crust, providing structure and texture.
- Confectioners’ Sugar (1/2 cup): This sweet touch lends a smooth texture to the crust and balances the richness of the caramel.
- Butter, softened (1/2 cup): The star of the crust, giving it a melt-in-your-mouth quality that pairs perfectly with the other flavors.
- Chopped Pecans (1 cup): Crunchy and nutty, pecans add a delightful crunch and enhance the overall richness of the bars.
- Caramel Sauce (1/2 cup): The gooey, sweet layer that ties everything together, bringing a luscious element that’s simply irresistible.
Step-by-Step Cooking Instructions
Step 1: Preheat and Prepare
Preheat your oven to 350°F (175°C) and grease a 9×9 inch baking pan. This step is crucial to ensure your bars come out easily and maintain their beautiful shape.
Step 2: Make the Shortbread Crust
In a mixing bowl, combine 1 cup of all-purpose flour, 1/2 cup of confectioners’ sugar, and 1/2 cup of softened butter. Use your hands or a pastry cutter to blend until the mixture is crumbly. Press the mixture firmly into the bottom of the prepared pan to form a solid crust.
Step 3: Bake the Crust
Bake in the preheated oven for 15-20 minutes, or until the crust is lightly golden. Remove from the oven and immediately sprinkle 1 cup of chopped pecans over the warm crust, ensuring even distribution.
Step 4: Add the Caramel Sauce
Drizzle 1/2 cup of caramel sauce evenly over the pecans, allowing it to seep into the crust and create a harmonious blend of flavors.
Step 5: Bake Again
Return the pan to the oven and bake for an additional 15-20 minutes, or until the caramel is bubbly and slightly thickened. The aroma will fill your kitchen, making it hard to resist sneaking a taste!
Step 6: Cool and Cut
Allow the bars to cool completely in the pan. Once cooled, cut into squares or bars, and prepare to enjoy the heavenly combination of flavors.
Frequently Asked Questions
1. Can I use salted butter?
Yes, salted butter can be used for a touch of extra flavor, but it’s best to adjust the amount of added salt accordingly.
2. How do I store leftover bars?
Store in an airtight container at room temperature for up to one week or in the refrigerator for up to two weeks.
3. Can I freeze these bars?
Absolutely! Wrap individual bars tightly in plastic wrap and place them in a freezer-safe container. They can be frozen for up to three months.
4. Can I use store-bought caramel sauce?
Yes, store-bought caramel sauce is a convenient option and works wonderfully in this recipe.
5. What can I substitute for pecans?
You can substitute pecans with walnuts, almonds, or even mixed nuts if desired.
6. Can I make these bars ahead of time?
Yes, they can be made a day or two in advance. Just store them properly to maintain freshness.
7. How can I make the bars more chocolatey?
Drizzling some melted chocolate over the cooled bars or adding chocolate chips to the pecans before baking can enhance the flavor.
8. Is it possible to make these gluten-free?
Yes, substitute the all-purpose flour with a gluten-free flour blend to make these bars gluten-free.
9. How do I know when the caramel is bubbly?
Look for the caramel to start bubbling and gently thickening around the edges, indicating that it’s ready.
10. Can I add more nuts?
Feel free to add additional nuts or even chocolate chips for a richer texture.
Helpful Tips
Tip 1: Use room temperature butter for easier mixing and a smoother crust.
Tip 2: Press the crust firmly into the pan to create a solid base.
Tip 3: Make sure the caramel sauce is evenly distributed to avoid uneven gooeyness.
Tip 4: Allow the bars to cool completely before cutting to prevent them from falling apart.
Tip 5: Experiment with different nuts to find your favorite combination.
Tip 6: Keep a close eye on the baking time to avoid burning the pecans.
Tip 7: Serve these bars warm for an extra gooey experience.
Tip 8: Pair with a scoop of vanilla ice cream for a decadent dessert.
Tip 9: Make these bars festive by drizzling with melted chocolate and sprinkling with sea salt.
Tip 10: Keep the bars in a cool place to maintain their texture and flavor.
Storage and Reheating Tips
- Storing: Keep the bars in an airtight container at room temperature. For longer freshness, refrigerate them.
- Reheating: If you prefer warm bars, place them in the microwave for 10-15 seconds before serving.
Recipe Secrets
Secret 1: For an extra buttery flavor, use European-style butter.
Secret 2: Lightly toasting the pecans before adding them can enhance their nutty flavor.
Secret 3: Add a pinch of sea salt to the caramel for a salted caramel twist.
Secret 4: For a touch of decadence, sprinkle some flaky sea salt on top just before serving.
Secret 5: If you’re feeling adventurous, try adding a splash of bourbon to the caramel sauce for depth.
Secret 6: Use parchment paper to line the baking pan for easy removal.
Secret 7: To achieve a chewy texture, avoid overbaking the bars.
Secret 8: Allow the bars to sit for a few hours (or overnight) to allow the flavors to meld.
Secret 9: Consider drizzling a bit of chocolate on top for an elegant finish.
Secret 10: Personalize these bars by adding a splash of vanilla extract to the crust mixture for an aromatic touch.
Enjoy these Pecan Caramel Turtle Bars as a sweet treat that captures the essence of comfort and joy. Perfect for sharing or indulging in all by yourself, this recipe is sure to become a family favorite! Happy baking!