
Decadent Lunchroom Ladies Brownies – A Timeless Classic
Ingredients Overview:
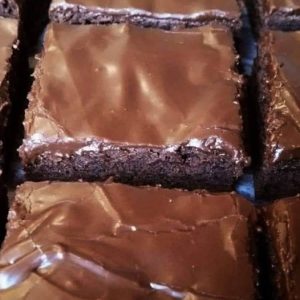
These brownies are a testament to classic American baking, perfected over half a century. With a base of rich cocoa, creamy butter, and just the right balance of flour and sugar, they promise a fudgy, indulgent texture that melts in your mouth. Eggs add structure, vanilla enhances flavor, and chopped nuts provide a delightful crunch.
Ingredients:
1 cup butter
1/2 cup cocoa
2 cup flour
2 cup sugar
4 eggs
4 tsp vanilla
1 cup chopped nuts
Step-by-Step Cooking Instructions:
1. Preparing the Batter: In a large mixing bowl, melt 1 cup of butter and stir in 1/2 cup of cocoa until smooth. Let this mixture cool slightly. Add 2 cups of flour and 2 cups of sugar, mixing well until combined. Crack in 4 eggs, one at a time, ensuring each is fully incorporated. Stir in 4 teaspoons of vanilla extract for that signature aroma. Finally, fold in 1 cup of chopped nuts (walnuts or pecans work beautifully).
2. Baking the Brownies: Preheat your oven to 350°F (175°C). Grease a 9 x 13-inch baking pan or line it with parchment paper for easy cleanup. Pour the brownie batter into the prepared pan, spreading it evenly with a spatula. Bake in the preheated oven for 20-25 minutes. Check at the 20-minute mark by inserting a toothpick into the center; if it comes out with a few moist crumbs clinging to it, the brownies are ready.
3. Making the Icing: While the brownies bake, prepare the icing. In a medium bowl, combine 1/4 cup of softened butter, 1/4 cup of cocoa powder, and a dash of salt. Gradually add 3 cups of powdered sugar, alternating with 1/4 cup of canned milk (regular milk works too), until the icing is smooth and spreadable.
4. Frosting the Brownies: Once the brownies are baked and cooled slightly (but still warm to the touch), spread the icing evenly over the top. Allow the brownies to cool completely before cutting into squares. This helps the icing set and ensures clean slices.
Storage and Reheating Tips: To store these brownies, place them in an airtight container at room temperature for up to 3 days. For longer storage, refrigerate for up to a week. You can also freeze them for up to 3 months; just ensure they are well-wrapped to prevent freezer burn. To reheat, simply microwave individual brownie squares for a few seconds or warm them in a low oven.
Frequently Asked Questions:
- What makes these brownies special?
- These brownies are beloved for their rich, fudgy texture and nostalgic taste reminiscent of old-school cafeteria desserts.
- Can I use margarine instead of butter?
- While margarine can be substituted, butter gives the brownies a richer flavor. If using margarine, adjust salt levels accordingly.
- Do I have to use nuts?
- No, nuts are optional. You can omit them if you prefer nut-free brownies.
- Can I use Dutch-processed cocoa?
- Yes, you can use Dutch-processed cocoa, but adjust the leavening agents accordingly if the recipe doesn’t call for baking powder or baking soda separately.
- How should I store these brownies?
- Store them in an airtight container at room temperature for up to 3 days, or refrigerate for longer freshness.
- Can I freeze these brownies?
- Yes, these brownies freeze well. Wrap them tightly in plastic wrap and foil, or store in a freezer-safe container for up to 3 months.
- Can I reduce the sugar in the recipe?
- The sugar amount contributes to the texture and sweetness. You can experiment with reducing it slightly, but it may affect the texture of the brownies.
- What kind of pan should I use?
- Use a 9 x 13-inch baking pan for this recipe for best results.
- How do I know when the brownies are done?
- Insert a toothpick into the center; it should come out with a few moist crumbs attached when they’re ready.
- Can I use a different type of frosting?
- Yes, you can customize the frosting to your preference. Cream cheese frosting or a simple ganache would also complement these brownies well.
Helpful Tips:
1. Room Temperature Ingredients: For best results, ensure your butter, eggs, and milk are at room temperature before mixing. This helps achieve a smooth batter consistency.
2. Parchment Paper Lining: Lining your baking pan with parchment paper makes it easier to remove the brownies from the pan and facilitates cleanup.
3. Sifting Dry Ingredients: Sift the flour and cocoa powder before adding to the wet ingredients to prevent lumps and ensure even distribution.
4. Let Them Cool: Allow the brownies to cool completely before frosting and cutting. This prevents the icing from melting and ensures neat slices.
5. Customize Your Icing: Adjust the thickness of the icing by adding more powdered sugar for a thicker layer or more milk for a thinner consistency, based on your preference.
- Ensure all ingredients are at room temperature for even mixing.
- Sift flour and cocoa powder to avoid lumps in the batter.
- Grease and flour the baking pan or use parchment paper for easy removal.
- For extra fudgy brownies, slightly underbake them; the residual heat will continue to cook them as they cool.
- Use high-quality cocoa for the best flavor.
- Allow the brownies to cool completely before frosting to prevent the frosting from melting.
- Double-check the oven temperature with an oven thermometer for accurate baking.
- Use an electric mixer for easier and more thorough mixing of the batter and frosting.
- Add a pinch of espresso powder to enhance the chocolate flavor.
- Experiment with different types of nuts or add-ins like chocolate chips for variety.
Secrets (Expert Tips)
- For a shiny top crust, beat the eggs and sugar together until light and fluffy before adding other ingredients.
- Let the brownies sit for a few hours after baking to develop a richer flavor.
- Use unsalted butter and adjust the salt in the recipe to control the overall saltiness.
- Substitute a portion of the flour with almond flour for a gluten-free option.
- Dust the nuts with flour before adding them to the batter to prevent them from sinking to the bottom.
- Warm the milk slightly before mixing it with the cocoa for a smoother icing texture.
- For a denser texture, use cake flour instead of all-purpose flour.
- Garnish with a sprinkle of sea salt on top of the frosting for a sweet-salty contrast.
- Use parchment paper overhang to easily lift the cooled brownies out of the pan for cleaner slicing.
- Allow the icing to set before cutting the brownies for cleaner slices and neater presentation.
These Lunchroom Ladies Brownies are not just a treat but a slice of nostalgia. Perfect for sharing with loved ones or indulging in a moment of self-care, they embody the essence of comfort and homemade goodness. Enjoy baking and savoring these timeless delights!