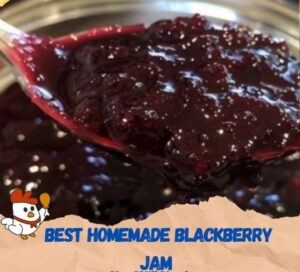
Best Homemade Blackberry Jam: A Timeless Delight
There’s something undeniably soothing about making homemade blackberry jam. The sweet aroma of simmering berries, the vibrant burst of color, and the sense of accomplishment when you spread your creation on a warm slice of toast—it’s a simple pleasure that brings joy to any kitchen. This blackberry jam recipe has been cherished and perfected over generations, and now, it’s your turn to enjoy the timeless tradition of jam-making.
Ingredient Overview
Blackberries:
The star of our jam, blackberries, offer a delightful balance of sweetness and tartness. Rich in vitamins C and K, these little berries not only taste fantastic but also pack a nutritional punch. When selecting blackberries, opt for ones that are plump, shiny, and deep in color for the best flavor.
Granulated Sugar:
Sugar is crucial for achieving the perfect texture and sweetness in your jam. It acts as a natural preservative, helping to extend the shelf life of your homemade creation.
Fresh Lemon Juice:
Lemon juice adds a refreshing tang and helps balance the sweetness of the blackberries. It also contains natural pectin, which aids in the thickening process of the jam.
Step-by-Step Cooking Instructions
Prepare the Blackberries:
- Rinse Thoroughly: Rinse the blackberries thoroughly under cold water to remove any dirt or debris.
- Mash the Berries: Place the blackberries in a large bowl and mash them with a potato masher or fork until you reach your desired consistency, whether chunky or smooth.
Cook the Jam:
3. Combine Ingredients: In a large saucepan, combine the mashed blackberries, granulated sugar, and fresh lemon juice. Stir well to ensure the ingredients are evenly mixed.
4. Heat the Mixture: Place the saucepan over medium heat and bring the mixture to a boil, stirring frequently to prevent sticking and burning.
5. Simmer to Perfection: Once the mixture reaches a boil, reduce the heat to medium-low and let it simmer for about 20-25 minutes, stirring occasionally. The jam will begin to thicken as it cooks.
Test the Jam:
6. Wrinkle Test: To test if the jam is ready, place a small spoonful on a chilled plate and let it sit for a minute. If it wrinkles and holds its shape when you push it with your finger, it’s ready. If not, continue to simmer and test again in a few minutes.
Sterilize the Jars:
7. Boil the Jars: While the jam is cooking, sterilize your jars and lids by boiling them in water for 10 minutes. Carefully remove them with tongs and place them on a clean kitchen towel to dry.
Fill the Jars:
8. Ladle the Jam: Once the jam is ready, remove it from the heat and let it cool for a few minutes. Carefully ladle the hot jam into the sterilized jars, leaving about 1/4 inch of headspace at the top.
9. Clean the Rims: Wipe the rims of the jars with a clean, damp cloth to remove any spills or drips.
10. Seal the Jars: Place the lids on the jars and screw on the bands until they are fingertip-tight.
Process the Jars:
11. Water Bath: Place the filled jars in a boiling water bath canner or a large pot with a rack at the bottom. Ensure the jars are fully submerged in water and bring it to a boil.
12. Process: Process the jars for 10 minutes, then carefully remove them with tongs and place them on a clean towel to cool.
13. Check Seals: Once cooled, check the seals by pressing down on the center of each lid. If it doesn’t pop back, the jar is sealed properly.
Store and Enjoy:
14. Storage: Store the sealed jars in a cool, dark place. Refrigerate any unsealed jars and use them within a few weeks.
15. Enjoy: Enjoy your homemade blackberry jam on toast, scones, or as a delicious addition to your favorite desserts!
Frequently Asked Questions
How long does homemade blackberry jam last?
Properly sealed jars can last up to a year when stored in a cool, dark place. Once opened, refrigerate and use within a few weeks.
Can I use frozen blackberries?
Yes, you can use frozen blackberries. Just make sure to thaw and drain them before mashing.
Is it necessary to use lemon juice?
Lemon juice helps balance the sweetness and aids in thickening the jam. It’s recommended for the best results.
Can I reduce the amount of sugar?
Reducing sugar can affect the texture and preservation of the jam. It’s best to follow the recipe for optimal results.
Why isn’t my jam thickening?
Ensure you are simmering the jam long enough and performing the wrinkle test on a chilled plate to check for readiness.
Do I need a special pot for making jam?
A heavy-bottomed saucepan works well. Ensure it’s large enough to prevent boiling over.
Can I reuse old jars?
Yes, as long as they are thoroughly cleaned and sterilized. Always use new lids for a proper seal.
What if my jam is too thick?
You can thin it by adding a little water and reheating gently.
Can I add other fruits?
Absolutely! Mixing in other berries or fruits can create delightful variations.
How do I fix jam that didn’t set?
Reheat the jam and add more pectin or lemon juice, then test again.
What is the best way to mash blackberries?
A potato masher or fork works well. For a smoother texture, you can use a blender.
Why is my jam foamy?
Foam can form during cooking. Skim it off with a spoon for a clearer jam.
Is there a substitute for lemon juice?
You can use lime juice or citric acid as a substitute.
How can I tell if a jar is properly sealed?
The lid should not pop back when pressed in the center.
What if a jar didn’t seal properly?
Refrigerate and use the unsealed jar within a few weeks.
Can I make jam without pectin?
Yes, this recipe relies on the natural pectin in the blackberries and lemon juice.
How do I store opened jam?
Keep it refrigerated and use it within a few weeks.
Can I double the recipe?
Doubling can affect cooking times. It’s best to make batches separately for consistency.
What is headspace?
Headspace is the space between the jam and the lid. Leaving about 1/4 inch allows for proper sealing.
Can I make this jam in a slow cooker?
A slow cooker isn’t ideal for jam as it may not reach the necessary boiling point for proper setting.
Helpful Tips
Use Fresh Blackberries:
For the best flavor, use fresh, ripe blackberries. Avoid berries that are overly soft or moldy.
Proper Stirring:
Stir the jam frequently while cooking to prevent sticking and burning.
Chill the Plate:
Chill the plate in the freezer before testing the jam. This helps determine if it’s set.
Use a Heavy-Bottomed Pan:
A heavy-bottomed pan distributes heat more evenly and reduces the risk of burning.
Sterilize Thoroughly:
Ensure jars and lids are thoroughly sterilized to prevent contamination and spoilage.
Don’t Rush the Process:
Simmer the jam patiently to achieve the perfect thickness. Rushing can lead to runny jam.
Check Seals:
Always check jar seals after cooling to ensure they are properly sealed.
Label Jars:
Label your jars with the date and type of jam for easy identification.
Avoid Overfilling Jars:
Leave about 1/4 inch of headspace to ensure proper sealing.
Experiment with Flavors:
Add a touch of vanilla or a splash of bourbon for a unique twist.
Skim Foam:
Remove foam from the top of the jam to ensure clarity and smooth texture.
Use a Timer:
Set a timer to avoid overcooking the jam.
Store in a Cool Place:
Store sealed jars in a cool, dark place to extend shelf life.
Use Fresh Lemon Juice:
Fresh lemon juice is more effective than bottled for thickening.
Prepare Everything in Advance:
Have all your equipment ready before you start cooking.
Be Cautious with Sugar:
Too little sugar can affect preservation; too much can make it overly sweet.
Test Early:
Start testing the jam for readiness a few minutes before the end of the cooking time.
Cool Before Filling:
Let the jam cool slightly before filling jars to prevent burns and spills.
Practice Patience:
Allow the jam to cool completely before tasting for the best texture and flavor.
Storage and Reheating Tips
- Cool, Dark Storage: Store sealed jars in a cool, dark place to maintain freshness.
- Refrigerate Open Jars: Once opened, keep jars refrigerated and use within a few weeks.
- Check Seals: Always check seals before storing to ensure they are airtight.
- Avoid Direct Sunlight: Keep jars out of direct sunlight to prevent spoilage.
- Label Clearly: Label jars with the date of preparation for easy tracking.
- Use Clean Spoons: Always use clean utensils to avoid contamination.
- Store Upright: Keep jars upright to prevent leaks and spills.
- Freeze for Longer Storage: For extended storage, freeze jam in freezer-safe containers.
- Reheat Gently: Reheat jam gently on the stove or microwave, stirring occasionally.
- Avoid Overheating: Overheating can alter the texture and flavor of the jam.
Recipe Secrets
- Use Quality Ingredients: The quality of your ingredients directly impacts the flavor of your jam.
- Balance the Sweetness: Adjust sugar levels to match the natural sweetness of your blackberries.
- Perfect Consistency: Achieve your desired consistency by controlling the mashing process.
- Natural Pectin: Utilize the pectin in lemon juice for a natural thickening agent.
- Low and Slow: Simmer the jam slowly to develop rich, concentrated flavors.
- Freshness is Key: Freshly picked blackberries provide the best taste and texture.
- Avoid Overcooking: Overcooking can lead to a stiff, overly thick jam.
- Proper Headspace: Leave adequate headspace to ensure proper sealing and preservation.
- Innovative Flavors: Experiment with adding herbs or spices for unique variations.
- Test for Readiness: The wrinkle test on a chilled plate ensures the perfect set.
Additional Sections
Pairing Suggestions:
Homemade blackberry jam pairs wonderfully with a variety of foods. Spread it on fresh bread, drizzle over yogurt, swirl into oatmeal, or use it as a glaze for meats.
Health Benefits:
Blackberries are rich in antioxidants, vitamins, and fiber, making this jam not only delicious but also nutritious.
Eco-Friendly Tips:
Reuse old jars and lids where possible, and consider supporting local farmers by purchasing fresh, organic blackberries.
Creative Uses:
Use your blackberry jam as a filling for pastries, a topping for ice cream, or mixed into salad dressings for a fruity twist.
Gifting Ideas:
Homemade blackberry jam makes a thoughtful and personalized gift. Decorate the jars with ribbons and labels for a charming touch.
Enjoy the calming process of making this delightful homemade blackberry jam and share the joy with your loved ones!


