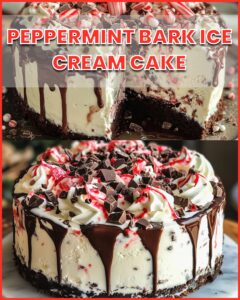
Peppermint Bark Ice Cream Cake Recipe: A Sweet Chill in Every Bite
There’s something magical about the combination of cool peppermint, rich chocolate, and creamy ice cream. It’s a dessert that speaks of festive gatherings, summer bliss, and pure indulgence. Whether you’re hosting a holiday dinner or simply looking for a show-stopping treat for a hot day, this Peppermint Bark Ice Cream Cake delivers both beauty and flavor. This recipe brings together layers of smooth ice cream, a crunchy cookie crust, and delightful peppermint candies for a dessert that’s as fun to make as it is to eat.
Ingredient Overview
Before diving into the recipe, let’s explore the ingredients that make this ice cream cake so irresistible:
- Chocolate Sandwich Cookies: These cookies form the base, offering a crunchy, chocolatey foundation for the cake.
- Melted Butter: The glue that holds the cookie crust together, adding richness and flavor.
- Peppermint Ice Cream: The star of the show, bringing a cool, minty freshness to the cake.
- Vanilla Ice Cream: A creamy counterpart to the peppermint layer, balancing the flavors.
- Crushed Peppermint Candies: These add a festive crunch and visual appeal to the cake.
- Hot Fudge Sauce: A luscious, chocolatey layer that ties everything together.
- Whipped Cream: Light and fluffy, this adds a delightful finishing touch.
- Chocolate Chips: A sprinkle of indulgence to top it all off.
Step-by-Step Cooking Instructions
Step 1: Prepare the Crust
- Crush the cookies using a food processor or place them in a ziplock bag and crush with a rolling pin until fine crumbs form.
- Mix in melted butter until the crumbs are evenly coated.
- Press the mixture firmly into the bottom of a springform pan to form the crust. Chill in the freezer for 10–15 minutes.
Step 2: Add the Peppermint Layer
- Soften the peppermint ice cream by leaving it at room temperature for about 10 minutes.
- Spread the softened ice cream evenly over the chilled crust. Return to the freezer and freeze until firm (about 30 minutes).
Step 3: Add the Vanilla Layer
- Soften the vanilla ice cream as you did with the peppermint.
- Spread the vanilla ice cream over the peppermint layer. Freeze again until firm (about 30 minutes).
Step 4: Add the Chocolatey Touch
- Warm the hot fudge sauce slightly to make it easier to spread. Spread it evenly over the frozen vanilla layer.
- Sprinkle crushed peppermint candies generously over the fudge layer. Freeze again until firm.
Step 5: Top and Decorate
- Just before serving, spread whipped cream over the top of the cake.
- Sprinkle with chocolate chips for a finishing touch.
- Carefully remove the sides of the springform pan, slice, and serve immediately.
20 Frequently Asked Questions (FAQs)
1. Can I use other types of cookies for the crust?
Yes, graham crackers or vanilla wafers work wonderfully as substitutes.
2. Can I use store-bought whipped cream?
Absolutely, but freshly whipped cream adds a special homemade touch.
3. How do I crush the peppermint candies?
Place them in a ziplock bag and crush with a rolling pin or pulse in a food processor.
4. Can I make this cake ahead of time?
Yes, you can prepare it up to three days in advance.
5. Can I use dairy-free ice cream?
Yes, dairy-free options work well, but ensure they freeze firmly.
6. How do I prevent ice cream from melting during assembly?
Work quickly and keep the cake in the freezer between layers.
7. Can I substitute the hot fudge sauce?
You can use chocolate ganache or caramel sauce for a twist.
8. What size springform pan should I use?
A 9-inch pan is ideal for this recipe.
9. Can I add additional toppings?
Crushed Oreos, sprinkles, or nuts make great additions.
10. How do I slice the cake cleanly?
Run a sharp knife under hot water, dry it, and then slice.
11. Can I omit the peppermint candies?
Yes, but they add a delightful crunch and flavor.
12. How long should I let the cake thaw before serving?
Let it sit for 5–10 minutes to soften slightly.
13. Can I use flavored whipped cream?
Yes, peppermint or chocolate whipped cream can enhance the flavor.
14. What if I don’t have a food processor?
Use a sturdy ziplock bag and a rolling pin to crush the cookies manually.
15. Can I layer the ice cream differently?
Feel free to experiment with the order or add extra layers!
16. Can I make individual servings?
Yes, use cupcake liners in a muffin tin for mini cakes.
17. How do I prevent the crust from sticking to the pan?
Line the bottom of the pan with parchment paper for easy removal.
18. Can I double the recipe?
Yes, but use a larger pan or make two cakes.
19. Is this recipe gluten-free?
Use gluten-free cookies and ensure other ingredients are certified gluten-free.
20. Can I add a drizzle of sauce on top?
Yes, chocolate or caramel drizzle adds extra flair.
Helpful Tips for Success
Tip 1: Soften ice cream just enough to spread easily but not melt.
Tip 2: Freeze each layer completely before adding the next.
Tip 3: Use a springform pan for easy release.
Tip 4: Press the crust firmly to avoid crumbling.
Tip 5: Chill your mixing bowls for whipped cream preparation.
Storage Tips
- Freeze in an airtight container to prevent freezer burn.
- Wrap the cake tightly with plastic wrap if storing in the pan.
- Store leftover slices in individual containers for easy serving.
- Avoid storing near strong-smelling foods.
- Consume within two weeks for best flavor.
Recipe Secrets
- Add a splash of peppermint extract to intensify the mint flavor.
- Use high-quality chocolate for the best hot fudge layer.
- Experiment with different ice cream flavors for a unique twist.
- Toast the crushed peppermint candies slightly for a deeper flavor.
- Layer the whipped cream with thin chocolate shavings for added elegance.
Closing Thoughts
This Peppermint Bark Ice Cream Cake is more than a dessert—it’s a statement piece for your table. With its festive colors, cool flavors, and rich textures, it’s sure to become a family favorite. Try it today and savor the joy of creating something special for your loved ones!

