
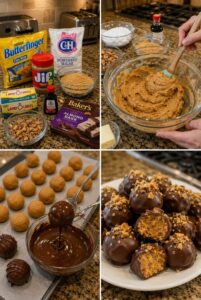
If you’re looking for an easy candy-style dessert that is creamy, crunchy, sweet, and perfect for sharing, these No-Bake Butterfinger Balls are the perfect treat to make.
Made with crushed Butterfinger candy bars, peanut butter, powdered sugar, butter, vanilla, graham cracker crumbs or crushed cookies, and melted chocolate coating, these little dessert balls are rich, crunchy, and full of peanut-buttery candy flavor. They taste like homemade truffles mixed with the crispy, flaky texture of Butterfinger.
This recipe is perfect for holiday dessert trays, Christmas candy boxes, bake sales, birthday parties, potlucks, game day sweets, movie nights, or anytime you need an easy no-bake treat that looks cute and tastes amazing.
The filling is sweet, creamy, and crunchy, while the chocolate coating gives each bite a smooth candy shell. They are simple to make ahead, easy to chill, and perfect for gifting.
Why You’ll Love This Recipe
No baking needed
Sweet and crunchy
Loaded with Butterfinger flavor
Perfect for holidays
Easy candy-style dessert
Great for gifting
Simple ingredients
Kid-friendly treat
Perfect for party trays
Creamy peanut butter filling
Chocolate-coated outside
Make-ahead friendly
Freezer-friendly
Great for bake sales
Always disappears fast
Ingredients You’ll Need
Butterfinger candy bars, crushed
Creamy peanut butter
Powdered sugar
Butter, softened
Vanilla extract
Graham cracker crumbs or crushed vanilla wafers
Chocolate chips or chocolate melting wafers
Coconut oil or shortening, optional
Optional Add-Ins
Cream cheese
Crushed pretzels
Mini chocolate chips
Chopped peanuts
Toffee bits
White chocolate drizzle
Caramel drizzle
Sea salt flakes
Peanut butter chips
Sprinkles
Crushed cookies
Butterscotch chips
Extra Butterfinger crumbs
Dark chocolate coating
Holiday sprinkles
How to Make No-Bake Butterfinger Balls
Step 1: Crush the Butterfinger Candy
Place the Butterfinger candy bars in a sealed bag.
Crush them with a rolling pin or the bottom of a cup.
You want a mix of fine crumbs and small crunchy pieces.
The fine crumbs help flavor the filling, while the larger bits give the balls that classic Butterfinger crunch.
Step 2: Make the Filling Base
In a large bowl, add creamy peanut butter, softened butter, powdered sugar, and vanilla extract.
Mix until smooth and thick.
The peanut butter gives the filling a rich candy flavor, while the powdered sugar sweetens and helps the mixture hold together.
Step 3: Add Graham Cracker Crumbs
Stir in graham cracker crumbs or crushed vanilla wafers.
This helps thicken the filling and gives the balls a soft, cookie-like texture.
Add a little at a time until the mixture is firm enough to roll.
Step 4: Add Butterfinger Pieces
Fold in the crushed Butterfinger candy.
Mix gently until evenly combined.
Do not overmix, because you want to keep some crunchy candy pieces in the filling.
Step 5: Chill the Mixture
Cover the bowl and chill the mixture for 20–30 minutes.
Chilling makes the filling easier to roll and helps the balls hold their shape.
If the mixture still feels too soft, add a little more graham cracker crumbs or powdered sugar.
Step 6: Roll into Balls
Scoop small portions of the mixture and roll them into balls.
Use about 1 tablespoon per ball for a bite-sized treat.
Place the balls on a parchment-lined baking sheet.
Try to keep them similar in size so they look neat on a dessert tray.
Step 7: Chill Again
Place the rolled balls in the refrigerator or freezer for 15–20 minutes.
This helps them firm up before dipping in chocolate.
Cold balls are easier to coat and less likely to fall apart in the melted chocolate.
Step 8: Melt the Chocolate
Add chocolate chips or melting wafers to a microwave-safe bowl.
Microwave in short intervals, stirring between each one, until smooth.
If the chocolate is too thick, stir in a small amount of coconut oil or shortening to make it easier to dip.
Step 9: Dip the Balls
Dip each chilled Butterfinger ball into the melted chocolate.
Use a fork to lift it out and let the extra chocolate drip off.
Place it back onto the parchment paper.
Work slowly and gently so the coating stays smooth.
Step 10: Add Topping
Before the chocolate sets, sprinkle extra crushed Butterfinger crumbs on top.
You can also add sprinkles, chopped peanuts, sea salt, or a white chocolate drizzle.
The topping makes the balls look finished and adds extra texture.
Step 11: Let the Chocolate Set
Place the tray in the refrigerator until the chocolate coating is firm.
This usually takes about 20–30 minutes.
Once set, the balls are ready to serve.
Step 12: Serve and Enjoy
Serve chilled or at room temperature.
These No-Bake Butterfinger Balls are rich, sweet, crunchy, and perfect for dessert trays or homemade candy boxes.
Serving Ideas
No-Bake Butterfinger Balls are perfect for:
Christmas dessert trays
Holiday candy boxes
Bake sales
Birthday parties
Game day sweets
Movie nights
Potlucks
Family dessert nights
Party favors
Cookie exchanges
Halloween treats
Thanksgiving dessert boards
Weekend snacks
Homemade candy gifts
Sweet snack plates
What to Serve With Them
These Butterfinger balls pair perfectly with:
Hot chocolate
Coffee
Milk
Vanilla ice cream
Chocolate ice cream
Brownies
Sugar cookies
Peanut butter cookies
Pretzels
Fresh strawberries
Caramel sauce
Whipped cream
Dessert boards
Holiday cookies
Chocolate drizzle
Frequently Asked Questions
Can I make these without baking?
Yes. This is a fully no-bake recipe.
You only need to chill the filling and melt the chocolate coating.
Can I use Butterfinger Bits?
Yes. Butterfinger Bits work great and save time.
You can still crush them slightly if you want smaller pieces mixed into the filling.
Can I use crunchy peanut butter?
Yes. Crunchy peanut butter adds extra texture.
Creamy peanut butter gives the smoothest filling, but both can work.
Can I use almond butter?
Yes, but the flavor will be different.
Peanut butter gives the most classic Butterfinger-style flavor.
Can I use white chocolate coating?
Yes. White chocolate tastes delicious with Butterfinger.
You can dip the balls fully in white chocolate or drizzle it over a milk chocolate coating.
Can I make these ahead of time?
Yes. These are perfect for making ahead.
Store them in the refrigerator until ready to serve.
Can I freeze Butterfinger Balls?
Yes. Freeze them in an airtight container with parchment paper between layers.
Thaw in the refrigerator before serving.
Why is my filling too soft?
The mixture may need more chilling time or more graham cracker crumbs.
Add a little more dry ingredient until it is firm enough to roll.
Why is my chocolate coating too thick?
Add a small amount of coconut oil or shortening and stir until smooth.
Melt the chocolate gently in short intervals to avoid overheating.
How long do they last?
They last up to 1 week in the refrigerator or up to 2 months in the freezer.
20 Detailed Tips for the Best No-Bake Butterfinger Balls
⭐ Crush the Butterfinger candy into mixed-size pieces.
⭐ Use creamy peanut butter for a smooth filling.
⭐ Soften the butter before mixing.
⭐ Add powdered sugar gradually.
⭐ Use graham cracker crumbs to firm the filling.
⭐ Chill the mixture before rolling.
⭐ Roll the balls evenly for a pretty tray.
⭐ Chill the balls again before dipping.
⭐ Use parchment paper for easy cleanup.
⭐ Melt chocolate slowly to keep it smooth.
⭐ Add coconut oil if the chocolate is too thick.
⭐ Dip chilled balls for the cleanest coating.
⭐ Tap off extra chocolate before placing on the tray.
⭐ Add toppings before the chocolate sets.
⭐ Use extra Butterfinger crumbs for decoration.
⭐ Refrigerate until fully firm.
⭐ Store in airtight containers.
⭐ Use mini cupcake liners for serving.
⭐ Freeze extras for later.
⭐ Make extra because these disappear fast.
Fun Variations
White Chocolate Butterfinger Balls
Dip the balls in white chocolate instead of regular chocolate.
This version is extra sweet and looks beautiful with crushed candy on top.
Dark Chocolate Butterfinger Balls
Use dark chocolate for the coating.
The deeper chocolate flavor balances the sweet candy filling.
Pretzel Butterfinger Balls
Add crushed pretzels to the filling.
This gives the balls a sweet and salty crunch.
Peanut Butter Butterfinger Balls
Add extra peanut butter or peanut butter chips to the filling.
This version has a stronger peanut butter candy flavor.
Caramel Butterfinger Balls
Drizzle caramel over the chocolate coating.
This makes the balls taste extra rich and candy-bar inspired.
Holiday Butterfinger Balls
Decorate with red and green sprinkles, white chocolate drizzle, or crushed candy pieces.
This version is perfect for Christmas trays and gift boxes.
Storage Tips
Store No-Bake Butterfinger Balls in an airtight container in the refrigerator for up to 1 week.
Keep parchment paper between layers so they do not stick together.
They can also be stored in the freezer for up to 2 months.
For serving, let them sit at room temperature for a few minutes if you want a softer bite.
Do not leave them in a warm room for too long because the chocolate coating can soften.
Make-Ahead Tips
You can make the filling a day ahead and roll the balls later.
You can also fully dip and decorate the balls ahead of time.
Keep them refrigerated until ready to serve.
For holiday trays, make them 2–3 days ahead and store them in a covered container.
For gifting, place each ball in a mini cupcake liner and pack them in a treat box.
Why This Recipe Works
This recipe works because the creamy peanut butter and powdered sugar create a sweet, smooth filling, while the crushed Butterfinger candy adds crispy, flaky crunch.
The graham cracker crumbs help the mixture hold its shape, and the chocolate coating turns each ball into a candy-style truffle. Chilling keeps the filling firm and makes the chocolate set perfectly.
The result is a rich, crunchy, chocolate-coated no-bake treat that is easy to make and perfect for sharing.
These No-Bake Butterfinger Balls are creamy, crunchy, sweet, chocolatey, and perfect for holidays, parties, bake sales, dessert trays, or homemade candy gifts.