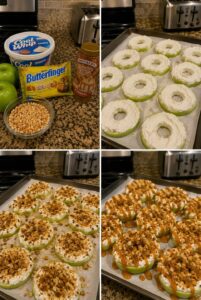
These Butterfinger Caramel Apple Bites turn crisp apple pieces into an easy no-bake treat covered with gooey caramel, melted chocolate, and crunchy Butterfinger candy. They deliver all the flavors of a loaded caramel apple in small, party-friendly bites that are much easier to make, serve, and eat.
They’re perfect for fall parties, Halloween gatherings, Thanksgiving dessert trays, game day, after-school treats, movie nights, or whenever you’re craving something sweet, tart, creamy, and crunchy.
Prep Time: 20 minutes
Chill Time: 20 minutes
Total Time: 40 minutes
Servings: 8–10
Why You’ll Love This Recipe
- No baking required
- Ready in about 40 minutes
- Easier to eat than whole caramel apples
- Sweet, tart, crunchy, and creamy
- Loaded with peanut-butter candy flavor
- Perfect for fall parties
- Easy to prepare with children
- Simple to customize
- Great for dessert trays
- Delicious with milk or dark chocolate
Ingredients
Apple Bites
- 3 large Granny Smith apples
- 2 cups cold water
- 1 tablespoon lemon juice
- 30–36 toothpicks or short appetizer skewers
Caramel Coating
- 1½ cups soft caramel candies, unwrapped
- 2 tablespoons heavy cream
Butterfinger Crunch
- 5 full-size Butterfinger candy bars
- ½ cup roasted peanuts, finely chopped, optional
Chocolate Drizzle
- ¾ cup semisweet chocolate chips
- 1 teaspoon coconut oil or butter, optional
Optional Toppings
- Mini chocolate chips
- Peanut butter drizzle
- Flaky sea salt
- Orange and brown sprinkles
- Chopped pretzels
- Additional crushed Butterfinger candy
How to Make Butterfinger Caramel Apple Bites
Step 1: Prepare the Baking Sheet
Line a large baking sheet or tray with parchment or wax paper.
Choose a tray that will fit inside your refrigerator.
Lightly spray the parchment with nonstick cooking spray if your caramel tends to stick.
Step 2: Crush the Butterfinger Candy
Place the Butterfinger candy bars in a sealed plastic bag.
Use a rolling pin or the bottom of a measuring cup to crush them into small pieces.
You want a mixture of fine crumbs and tiny crunchy chunks.
Transfer the crushed candy to a shallow bowl.
If using chopped peanuts, mix them with the candy crumbs.
Step 3: Prepare the Lemon Water
Combine the cold water and lemon juice in a medium bowl.
This mixture helps slow browning after the apples are cut.
Don’t use too much lemon juice because the apple pieces can develop a sour flavor.
Step 4: Cut the Apples
Wash and thoroughly dry the apples.
Cut each apple into quarters and remove the core and seeds.
Cut the quarters into approximately 1- to 1½-inch bite-size pieces.
Try to make the pieces similar in size so they’re easy to coat and arrange.
Leave the peel in place to help the bites remain firm.
Step 5: Prevent Browning
Place the apple pieces in the lemon water for approximately 1–2 minutes.
Drain them thoroughly.
Spread the apple pieces over clean paper towels and pat every side completely dry.
This is one of the most important steps because caramel won’t stick properly to wet apples.
Step 6: Insert the Toothpicks
Insert a toothpick or short appetizer skewer into the peel side of each apple piece.
Push it in far enough to hold the bite securely without passing completely through it.
Arrange the prepared apple bites on the lined baking sheet.
Step 7: Chill the Apples
Place the tray of apple bites in the refrigerator for approximately 10 minutes.
Cold, dry apples help the warm caramel begin setting more quickly.
Don’t freeze them because frozen apples can release moisture as they warm.
Step 8: Melt the Caramel
Place the unwrapped caramel candies and heavy cream in a microwave-safe bowl.
Microwave in 20-second intervals, stirring thoroughly after each interval.
Continue until the caramel is completely melted and smooth.
You can also melt the caramel in a small saucepan over low heat.
Step 9: Cool the Caramel Slightly
Allow the melted caramel to rest for approximately 2–3 minutes.
It should remain warm and fluid but shouldn’t be extremely hot or watery.
If the caramel is too hot, it can slide off the apples.
If it becomes too thick, reheat it for a few seconds.
Step 10: Dip the Apple Bites
Hold one apple bite by the toothpick and dip it approximately halfway into the melted caramel.
Turn it gently to create an even coating.
Allow the excess caramel to drip back into the bowl.
You can completely coat the bites, but a partial coating makes them easier to handle and helps the fresh apple remain visible.
Step 11: Add the Butterfinger Crunch
Immediately roll or press the caramel-coated portion into the crushed Butterfinger candy.
The caramel needs to be soft and tacky so the candy pieces adhere.
Press gently without pushing the apple off the toothpick.
Step 12: Arrange the Bites
Place each finished bite on the prepared baking sheet.
Repeat with the remaining apple pieces.
If the caramel becomes too thick during dipping, microwave it for approximately 10 seconds and stir.
Step 13: Melt the Chocolate
Place the chocolate chips in a microwave-safe bowl.
Add the coconut oil or butter if using.
Microwave in 15–20 second intervals, stirring between each interval, until smooth.
Avoid overheating the chocolate.
Step 14: Drizzle with Chocolate
Use a spoon or piping bag to drizzle the melted chocolate over the Butterfinger caramel apple bites.
For extra peanut-butter flavor, add a light peanut butter drizzle as well.
Step 15: Chill
Place the tray in the refrigerator for approximately 10–15 minutes.
Chill just until the caramel and chocolate are slightly firm.
Don’t refrigerate the uncovered bites for several hours because the exposed apples can dry out.
Step 16: Serve
Arrange the chilled bites on a serving platter.
Sprinkle them with additional crushed Butterfinger candy or a small pinch of flaky sea salt.
Serve while the apples are still fresh and crisp.
The Best Apples for Butterfinger Caramel Apple Bites
Granny Smith apples are especially good because their tart flavor balances the sweet caramel, chocolate, and candy.
Other good choices include:
- Honeycrisp
- Pink Lady
- Fuji
- Gala
- Braeburn
- Jazz
- Cosmic Crisp
Choose apples that are firm and crisp.
Avoid soft or mealy apples because the pieces need to support the caramel and candy coating.
Should You Peel the Apples?
Leaving the peel on is recommended.
The peel gives the toothpicks a firmer surface to hold and helps the apple pieces maintain their shape.
It also adds color and makes the bites look more like fresh caramel apples.
If you prefer peeled apples, make sure the pieces are large and firm enough to stay securely on the skewers.
The Secret to Getting Caramel to Stick
Freshly cut apples release moisture.
After dipping them in lemon water, dry every surface extremely well.
Any water remaining on the apples can make the caramel slide off.
Other helpful tips include:
- Use cold apples
- Use thick melted caramel
- Allow the caramel to cool slightly
- Coat only a few bites at a time
- Add the candy immediately
- Avoid using extremely thin caramel sauce
Soft caramel candies melted with a little cream generally create the most reliable coating.
Can I Use Store-Bought Caramel Sauce?
Yes, but it must be a very thick caramel topping.
Thin caramel sauce will run off the apple pieces and collect on the tray.
If your store-bought caramel is too thin, use it as a drizzle over the finished bites instead of as the main coating.
Melted caramel candies or caramel bits work better for dipping.
Can I Use Caramel Bits?
Yes.
Melt the caramel bits according to the package directions.
Add a small amount of heavy cream only if needed.
Allow the caramel to cool slightly before dipping the apples.
How to Keep Apple Bites from Turning Brown
A brief lemon-water treatment helps slow oxidation.
You can also use:
- Pineapple juice
- Orange juice
- Honey water
- Commercial fruit protector
Don’t soak the apples for a long time.
After treating them, pat them completely dry before adding the caramel.
For the freshest color and texture, prepare the bites shortly before serving.
How Big Should the Apple Pieces Be?
Cut the apples into approximately 1- to 1½-inch pieces.
Pieces that are too small can be difficult to dip and may fall off the toothpicks.
Pieces that are too large become difficult to eat in one or two bites.
Each piece should have enough peel to hold the toothpick securely.
How Finely Should You Crush the Butterfinger Candy?
Use a combination of crumbs and small pieces.
Fine crumbs stick easily to the caramel and cover empty areas.
Small crunchy pieces provide the recognizable Butterfinger texture.
Avoid leaving very large chunks because they can fall off or pull the caramel away from the apple.
Loaded Butterfinger Caramel Apple Bites
For an extra-loaded version, coat each apple bite with:
Caramel + crushed Butterfinger + chopped peanuts + chocolate drizzle + peanut butter drizzle.
Finish with additional candy crumbs and a tiny pinch of sea salt.
These look especially impressive arranged across a large fall dessert platter.
Peanut Butter Butterfinger Apple Bites
Place approximately:
- ¼ cup creamy peanut butter
- 1 teaspoon coconut oil
in a microwave-safe bowl.
Warm for 10–15 seconds and stir until smooth.
Drizzle the peanut butter over the finished apple bites.
Peanut butter strengthens the candy-bar flavor and pairs beautifully with tart apples and chocolate.
Chocolate-Dipped Butterfinger Apple Bites
Dip the apple pieces into melted chocolate instead of caramel.
Immediately roll them in crushed Butterfinger candy.
Finish with caramel drizzle and chopped peanuts.
This creates a firmer coating that may be slightly easier to handle at parties.
Salted Caramel Butterfinger Apple Bites
Use salted caramel for the main coating.
Finish each bite with chocolate drizzle and a small pinch of flaky sea salt.
The salt balances the sweetness of the caramel and candy while highlighting the tart apple flavor.
White Chocolate Butterfinger Apple Bites
Replace the semisweet chocolate with melted white chocolate.
Drizzle it over the caramel-coated bites and finish with Butterfinger crumbs.
For a mixed dessert platter, prepare half with semisweet chocolate and half with white chocolate.
Butterfinger Apple Nachos
Don’t want to prepare individual bites?
Slice the apples into thin wedges and arrange them across a large platter.
Drizzle with caramel, chocolate, and peanut butter.
Scatter crushed Butterfinger candy and chopped peanuts over everything.
Serve immediately as easy Butterfinger caramel apple nachos.
Butterfinger Caramel Apple Skewers
Thread three or four apple pieces onto longer bamboo skewers.
Drizzle or dip them in caramel and cover them with crushed Butterfinger candy.
Finish with chocolate drizzle.
These are easy for guests to pick up and work well for fall parties or dessert tables.
Halloween Butterfinger Apple Bites
Decorate the finished bites with:
- Orange and black sprinkles
- Candy eyes
- Halloween candy pieces
- Mini chocolate chips
- Purple candy melts
- Crushed chocolate cookies
Add the decorations while the caramel or chocolate is still soft.
Arrange the bites around a bowl of caramel dip for a festive Halloween platter.
Fall Caramel Apple Bite Platter
Prepare several topping combinations on one tray:
- Butterfinger Crunch
- Chocolate Peanut
- Salted Caramel
- Peanut Butter Pretzel
- White Chocolate Candy
- Caramel Pecan
Label each flavor or separate them into sections so guests can choose their favorite.
Can I Use Different Candy Bars?
Yes.
Replace the Butterfinger candy with:
- Snickers
- Heath bars
- Reese’s Peanut Butter Cups
- Twix
- Milky Way
- Crunch bars
- Peanut M&M’s
Chop or crush the candy into small pieces so it sticks to the caramel.
Can I Make Them Nut-Free?
Butterfinger candy and other ingredients may be produced with or near nut ingredients, so check every package carefully if allergies are a concern.
For a nut-free-style topping, use compatible:
- Crushed chocolate cookies
- Pretzels
- Graham crackers
- Mini chocolate chips
- Toffee-flavored baking pieces
Verify all ingredient labels based on your specific dietary needs.
How Far Ahead Can I Make Them?
These treats are best prepared shortly before serving.
You can prepare the toppings ahead:
- Crush the Butterfinger candy
- Chop the peanuts
- Measure the chocolate
- Unwrap the caramels
- Line the baking sheet
- Prepare the serving platter
Cut, dip, and decorate the apples close to serving time.
This gives you the crispiest apples and freshest appearance.
Storage
Place leftover Butterfinger caramel apple bites in a single layer inside an airtight container.
Refrigerate.
For the best texture and appearance, enjoy them within approximately 24 hours.
The apples will gradually release moisture, and the Butterfinger coating may begin to soften.
If stacking is necessary, place parchment paper between the layers.
Can You Freeze Butterfinger Caramel Apple Bites?
Freezing isn’t recommended.
Fresh apples lose their crisp texture after freezing and thawing.
The caramel may also become sticky or watery.
These treats are much better prepared fresh.
Frequently Asked Questions
What are Butterfinger Caramel Apple Bites?
They’re bite-size apple pieces coated with caramel, crushed Butterfinger candy, and melted chocolate.
What apple works best?
Granny Smith is an excellent choice because it’s firm, crisp, and tart.
Can I use Honeycrisp apples?
Absolutely. Honeycrisp apples provide a sweeter flavor while remaining very crisp.
Should I peel the apples?
No. Leaving the peel on helps the pieces remain firm and hold the toothpicks.
How do I keep the apples from browning?
Briefly dip them in diluted lemon juice and dry them thoroughly.
Why won’t my caramel stick?
The apple surface may be wet, or the caramel may be too hot and thin.
Can I use caramel sauce?
Yes, provided it’s thick enough to stay on the apple pieces.
Can I use milk chocolate?
Yes. Milk, semisweet, dark, and white chocolate all work.
Can I add peanut butter?
Yes. A warm peanut butter drizzle pairs perfectly with Butterfinger candy.
Can I make these without toothpicks?
Yes. Arrange the apple pieces on parchment and use a fork for dipping.
Can I turn them into apple nachos?
Yes. Arrange thin apple slices on a platter and drizzle all the toppings over them.
Can I use another candy bar?
Definitely. Snickers, Heath, Reese’s, Twix, and Crunch bars are good alternatives.
Can I prepare them ahead?
Prepare the toppings ahead, but cut and decorate the apples close to serving time.
How long will they keep?
They’re best the day they’re made.
Can I freeze them?
No. Freezing significantly changes the texture of fresh apples.
Pro Tips
Choose firm, crisp apples and cut the pieces large enough to remain securely attached to the toothpicks. After treating the apples to slow browning, dry them extremely well.
Use thick melted caramel rather than watery sauce, crush the Butterfinger candy into a mixture of crumbs and small pieces, and apply it while the caramel is still tacky.
Work in small batches so the caramel doesn’t harden before you add the toppings. A chocolate drizzle, peanut butter drizzle, and tiny pinch of sea salt create the best balance of sweet, tart, salty, creamy, and crunchy.
Final Thoughts
These Butterfinger Caramel Apple Bites are an easy way to enjoy loaded caramel-apple flavors without the mess of biting into a whole coated apple. Crisp, tart apples create the perfect base for gooey caramel, crunchy Butterfinger candy, melted chocolate, and roasted peanuts.
Make them for a fall party, Halloween dessert table, movie night, or quick family treat. You can also transform the same idea into Butterfinger apple nachos, chocolate-dipped apple bites, salted caramel bites, or peanut butter apple skewers for a fun no-bake dessert everyone can customize.